Wednesday, November 24, 2010
Friday, November 19, 2010
Candy Clay Recipe
Here is the candy clay recipe I use to make the card. It is very easy to make !
Candy Clay Recipe
Ingredients
14 oz pkg of Candy Melts.
1/3 cup of Light Corn Syrup (Karo)
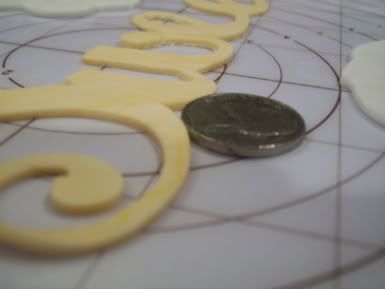
Following the directions on the package melt the candy melts. Add the 1/3 cup of corn syrup .It will become very stiff at first. Do not over mix! Turn out mixture onto waxed paper and let set at room temperature to dry. Wrap and store at room temperature until needed. I wrap it in plastic wrap then put it in a zip lock bag. it's better to let it rest over night. It will become hard knead a small amount at a time until workable. If candy clay gets too soft, set aside at room temperature or refrigerate briefly. When rolling out candy clay, sprinkle work surface with cornstarch or cocoa powder (for cocoa clay) to prevent sticking; roll to approximately 1/8 inch. thick (the thickness of a nickel). White candy clay can be tinted using Candy Color or Icing Color. Knead in color until well blended. Candy Color is oil based. Do not let ANY water get near the chocolate. Candy Clay will last for several weeks at room temperature in an airtight container.
Candy Clay Recipe
Ingredients
14 oz pkg of Candy Melts.
1/3 cup of Light Corn Syrup (Karo)
Following the directions on the package melt the candy melts. Add the 1/3 cup of corn syrup .It will become very stiff at first. Do not over mix! Turn out mixture onto waxed paper and let set at room temperature to dry. Wrap and store at room temperature until needed. I wrap it in plastic wrap then put it in a zip lock bag. it's better to let it rest over night. It will become hard knead a small amount at a time until workable. If candy clay gets too soft, set aside at room temperature or refrigerate briefly. When rolling out candy clay, sprinkle work surface with cornstarch or cocoa powder (for cocoa clay) to prevent sticking; roll to approximately 1/8 inch. thick (the thickness of a nickel). White candy clay can be tinted using Candy Color or Icing Color. Knead in color until well blended. Candy Color is oil based. Do not let ANY water get near the chocolate. Candy Clay will last for several weeks at room temperature in an airtight container.
Thursday, November 18, 2010
Chocolate Christmas Card
Well, I finally got to work on a Chocolate Christmas Card. If you are not use to working with chocolate ( which would be me ) it can be VERY temperamental. I am in no way a Chocolatier ! Love it, but boy can it be a real pain in the you know what.
I made this card with White Chocolate,.Dark Chocolate and Red Chocolate. You can get them at Michael's or AC Moore's. I also made some Candy Clay. The candy clay worked really well in the Cake machine. It is made with Chocolate and Clear Corn Syrup (Karo).
The card is 4x7. The snowman and the joy are made from the Candy Clay. The poinsettia is made with all Red Chocolate. The snow going around the card is all White Chocolate. The back round is a Snowflake Cuttlebug folder.I also used MS Pearl Dust.
I used the Christmas Cheer Cart for the Joy, Snow Friends for the Snowman and Joy of the Season for the poinsettia. I did roll out the Candy Clay and cut what I needed and then I took the melted chocolate and put it right on the mat,spread it out let it harden a little then cut out the decos. Thanks for stopping by!


The card is 4x7. I used the top of a Chinese take out lid filled it with chocolate to make the card .
I put the chocolate melts in a bowl and put them in the microwave on Defrost for 30 second at a time till they were melted. I then poured it into the lid and let it set up.
I let the Chocolate settle and dry. While it was drying I melted some red chocolate melts. Poured that onto my mat , let it rest for 5 minutes and then cut out the poinsettias the CC. After they was cut I put it in the freezer for no more than 3 minutes. The cuts came right off and I place them on a piece of plastic. You could use parchment paper or wax paper also.
For the back round I used a Cuttlebug folder. I rolled out a piece of candy clay and then put that into the folder and rolled it a couple of times . I then cut it to fit in the center of the card.
The Snowman the boots and the scarf were colored with Wilton's candy colors. I rolled out the colors on the mat and cut what I needed. I used melted white chocolate to make the snow around the edges of the card.
It really came out nice for being the first one! I will make these again. Don't be afraid to try making one you will be surprised how much fun they can be to make and give away!!!
Sunday, October 31, 2010
Saturday, October 30, 2010
Another Christmas Card.
Since the Cricut Circle board was down ,I thought I would work on another Christmas card. This is a 5x7 card. I used Joys of the Seasnon for the Drum, Holly and Soldier. Christmas/Noel for the Teddy Bear and Christmas Cheer for the Stocking and Candy Cane.


Wednesday, October 27, 2010
Getting Ready For Christmas.
I started making some Christmas cards. If I don't start them now I will never get them done ! I really love Christmas! Some are just regular cards and one is a easel card. I hope you enjoy! And Thanks for stopping by.


Wednesday, October 20, 2010
I Made This Tri Fold / Tri Shutter Card Tutorial.
I am the type of person who is more visual when it comes to making crafts. So what I did was to make this Tutorial my way, hoping it will help others who are alot like me when it comes to making cards and doing scrapbooking. I do want to thank The Craftiblog for putting this on their blog! This will fit into a standard invitation size envelope when it is all folded.
I am posting as many photo's as I can to help. So here we go!!
I am posting as many photo's as I can to help. So here we go!!
Instructions
First I cut a piece of cardstock to a 5 1/2 x 12. I turned it long ways and then I scored it at 2", 4", 8" and at 10" . After I scored it I took a pencil and drew down the score lines so you could it better.


Then I turned the card around and to make the cuts in the center. Measure at 1 1/2 " from the outside . From the 10 " score line down to the 2" score line make a cut. Now turn the card around measure over 1 1/2 inches and cut from the 2" score line down to the 10' score line. (see photos).


Your card should now look like this. (See photos)


Take the 4" top score and the bottom 4" score and bent it towards you. Do the same for the 8" center score.


Now take and bend the 4" center, the top and bottom of the 8" score and bend it away from you.


When folded it should look like this. Open it looks like this.


Saturday, October 16, 2010
Posted On The Cricut Cake Board.
A few things that were made using the CC machine. This is what thickness I was working with when I first got to play with it. These are reposted. But it will give you an idea of what you can do with the CC machine.
This was a test run on cutting out the word sweet.
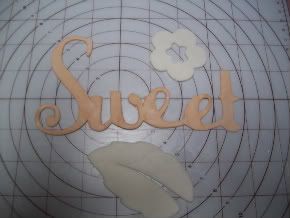
I had to see if I could layer with the CC.
This was a test run on cutting out the word sweet.
I had to see if I could layer with the CC.
Happy Haunting !
Here is a Happy Halloween Card I started last night and finally finished it today!It is called a Trifold Card. . I used Happy Hauntings and Paper Doll Dress Up. Not bad for the first one ! I still have a long way to go with making cards. Hope you enjoy!!


Friday, October 15, 2010
Thanks For Following!
Being new to blogging I wanted to say Thank You for stopping by and being a follower! I am the only one in my family who Scraps. For me blogging is a good way to show the things I make. My hubby is very supportive in anything I do. I like to share and follow other bloggers to get ideas! I am proud to be a member of the Cricut Board! It is nice to see so many creative crafts.
Thursday, October 14, 2010
A Yellow Rose
This card is what gave me the inspiration to make the Edible card. I like the backround paper. I don't remember where I got it from. Simple yet sweet!


Live Laugh & Love
I do enjoy making cards. Here is one that I thought was one to live by. It is just a simple card. The size is 5x7.


Wednesday, October 13, 2010
3D Spiderman Cake
Here is my first 3D cake. I had alot of fun making this one! One of my grandson's wanted a Spiderman cake for their B-Day, so I decided to make him one !! lol He didn't want to cut the cake. But Mom Mom said it was ok! I was amazed at how it all came together. The Spiderman head is styrofoam, one of those foam heads you get at the beauty supply store. It was cut and shaped to look like him. I LOVE how it turned out!!! The cake was covered in all Fondant.


Subscribe to:
Comments (Atom)