14 oz. Pkg of Candy melts
1/3 C light corn syrup
Instructions
Melt candy melts following package directions. Add corn syrup just till it is mix. Do NOT over mix it!!! Turn out mixture onto waxed paper and let set out on the counter to dry. Wrap in plastic wrap well and store at room temperature until needed. Candy Clay handles best if hardened overnight.
White candy clay may be tinted using candy color or icing color. Knead in color until well blended.
Tuesday, November 1, 2011
Sunday, October 30, 2011
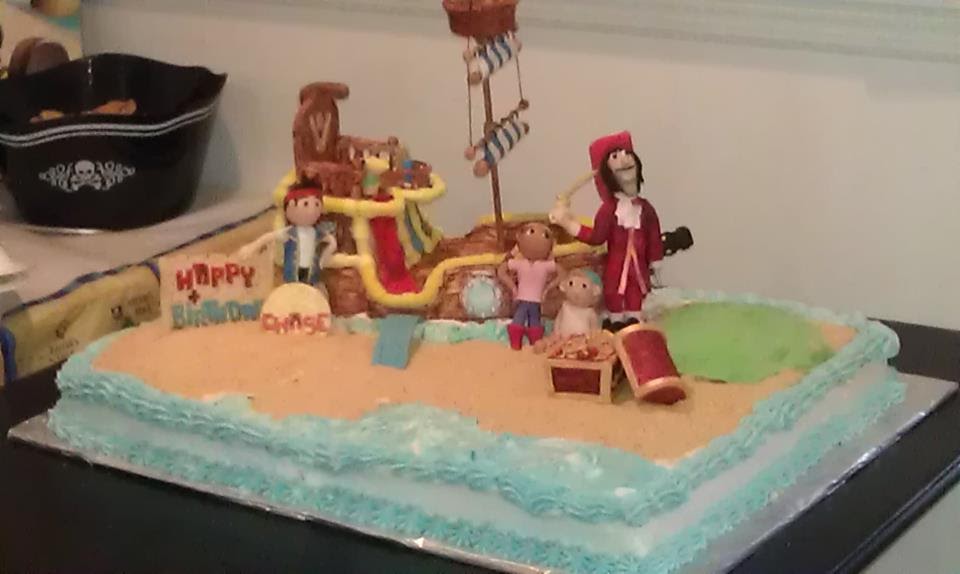
Chase's 3rd Birthday Party using the Imagine
We celebrated my Grandsons birthday party with Jake and the Neverland pirates. My grandson Chase just love them ! So for his Birthday I made him his cake. I also used my Imagine for the decorations and the maps. I made six maps and each one had a clue on it. The kids went through out the house and down the street to the neighbors front yard to find the treasures. Everybody loved the cake and the decorations !


Tuesday, August 16, 2011
Doing Some Disney Scrapbooking.
Thought I would get back to working on my Disney album.


We had a great time ! I can't wait to go back !!


Thursday, May 5, 2011
I Received My E2 On Monday.
I was so excited when my E2 arrived on Monday ! I love the new features on it. Love the screen. This machine is very easy to work with. I like the fact I can now buy some of the Imagine carts, and use them in the E2. I don't own an Imagine but I do like the carts they made for it. It was easy to set up, I took it out of the box, plugged it in and started cutting right away ! I did get to do the update. Works well with my Gypsy, even though I'm still learning how to use the G. lol PC did a great job on this machine ! I'll post some projects from the pre-loaded carts as soon as I can.


Saturday, April 2, 2011
Today I Made Peanut Butter &Coconut Butter Cream Eggs
It's that time of year again! Easter is coming, so I started to make my Easter eggs for the kids and GrandKids. I made Peanut Butter eggs with milk chocolate. And Coconut Butter Cream Eggs in dark chocolate.


Wednesday, March 30, 2011
Strawberry Shortcake
Made my family some Strawberry Shortckae. I was really pleased how it turned out. This cake was made with whipped topping and layered with Strawberrys and Sponge cake.


Sunday, March 6, 2011
Gum Paste Recipe
This is the GP recipe I use.
Gum Paste Recipe
Here is where I get my Tylose from..
http://www.globalsugarart.com/search.php?search=tylose
Gum Paste Recipe
* 1/2 Cup Water
* 2 Tbsp Gelatin
* 2 1/2 Tbsp Shortening (melted )
* 1/3 Cup Corn Syrup
* 2lbs Powdered Sugar
* 2 1/2 - 3 Tbsp Tylose
Heat a pot of water on the stove.
Put gelatin in 1/2 cup of water and let stand for 5 mins. I use a glass measuring cup.
Place bowl of gelatin into pan of hot water and heat until dissloved.
Add corn syrup and cook for about 1 minute.
Add melted shortening, cook until completely mixed.
Pour mixture into a 4 1/2 qt mixing bowl, add powered sugar,and the Tylose, mix with a dough hook until completely mixed.
Add color if desired.
Place the GP in plastic wrap and place in a plastic bag and let rest over night or for a least 24 hours.Here is where I get my Tylose from..
http://www.globalsugarart.com/search.php?search=tylose
Recipes For Cake Decorating
I was given the green light to post this from one of the members at CakeCentral.
Marshmallow Fondant – MacsMom’s BC flavored variation
Ingredients
•16 oz mini-marshmallows (NOT Jet Puffed)
2 tablespoons water
1 tablespoon glycerine
2 drams of LoRann butter flavor *(it is the strongest and tastiest flavoring, but you may use 2 teaspoons of another butter extract, adding an extra teaspoon of vanilla extract)
1 teaspoon popcorn salt (I grind my own salt in a coffee grinder – if you don’t, you may get crystallization that leaves your fondant covered cake pock-marked)
Food coloring if using
2 lbs powdered sugar
Instructions
Grease a large microwave-safe bowl with either shortening or non-stick spray. Pour in the marshmallows and sprinkle with water. Melt about 1 minute (don’t go over 90 seconds or it will make the MMF tough).
Add the rest of the ingredients except the powdered sugar, including food coloring if desired, and stir with a greased sturdy spatula (again, you can use non-stick spray) .
Add a small amount of PS at first to absorb moisture and avoid clumping – about 1/2 c. Then you can add larger amounts, trying to get as much mixed in as possible with each addition. When I have half of the bag of PS left, I dump it in and knead with my greased hands.
MMF can be temperamental so it’s good to get to know it at this point–what it should feel like before wrapping it in plastic wrap. If it is too soft it will be hard to work with; too hard isn’t nearly as bad but you still want to find that happy medium.
When it is humid, rainy or foggy, or hot outside, MMF sometimes requires more PS than a 2 lb bag. That is the main reason I try to knead in every bit of PS I can between additions. Perfect weather sometimes calls for less PS.
Thursday, January 27, 2011
Made My First TC Stamp.
I decided to try out my TC StampMaker today. Here are pictures of how and what I made. I like the stamp machine. There are a lot of things you could make into clear stamps or stencils even embossing dies.It really was very easy to use!


Sunday, January 23, 2011
GumPaste Gerbera Daisy Using The Mother's Day Bouguet Cart
I finally got a chance to sit down and look at the Mother's Day Bouguet cart. I found quite a few flowers on this cart that can be used to make Roses, Carnations, Gerbera Daisy and regular Daisy's. Also the leaves will workout just great. Anyone who likes to make gum paste flowers knows that the flower molds are not cheap. So I decided I would do a little research on the web and look for different kinds of gum paste flowers. I found this website called Make Fabulous Cakes. ( www.make-fabulous-cakes.com ) I seen the Gerbera Daisy and knew I could make it with the Cricut Cake machine. I used the CC and the MDB cart. Here is my way of doing the Gerbera Daisy using the CC machine.


Here you will cut out 2 Daisy flowers. One at 2 1/4 and one at 2 3/4

After you cut out the flowers you will need to take a knife and cut into each petal. Here you will see a circle in the center of the flower, that is so you don't cut down to far in the center.


After you cut each petal you will need to take a paper clip and bend it at the top to make the Daisy impressions. After you have put an impression on each petal, place it in an egg container or something that will give the flower some shape. You can also use foil if you don't have any egg cartons. Use 50/50 gum paste and fondant. Or you can use Tylose and water mix. After you have made the flowers take some glue and put some in the center of the 2 3/4 one. Take the 2 1/4 flower and place the smaller one on top of the bigger one.


You will need to cut out 10 or more small Daisy's at 1 inch. Shown in the picture below you will need to cut them in half and then cut each little petal.


Once you have the small petals cut you are going to place them in the center of the flower. Use your glue to hold them in place. After you have made the first row make a second one.


Let the flower set for a little bit to harden. I took my Gerbera Daisy and airbrushed it Pink with a little luster dust. Hubby bought me an airbrush gun for my birthday back in July and this is the first time I got to use it.


After you have let it dry some, take a small piece of gum paste and roll it in a ball. Take the ball and put it in the center of the flower and push it down in the center a little. Use a small pair of scissors or something sharp. I used my exacto knife and just started cutting into the center of the flower.


Let the flower dry. This could take a day or two depending on how thick the flower is and what the temperature in your house is. I hope you will try to make one. You'll be surprised how easy this flower really is !!!
Thanks for stopping by!!
Subscribe to:
Posts (Atom)