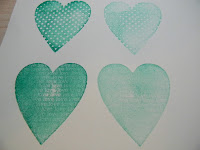
I decided to try out my TC StampMaker today. Here are pictures of how and what I made. I like the stamp machine. There are a lot of things you could make into clear stamps or stencils even embossing dies.It really was very easy to use!
Thursday, January 27, 2011
Sunday, January 23, 2011
GumPaste Gerbera Daisy Using The Mother's Day Bouguet Cart
I finally got a chance to sit down and look at the Mother's Day Bouguet cart. I found quite a few flowers on this cart that can be used to make Roses, Carnations, Gerbera Daisy and regular Daisy's. Also the leaves will workout just great. Anyone who likes to make gum paste flowers knows that the flower molds are not cheap. So I decided I would do a little research on the web and look for different kinds of gum paste flowers. I found this website called Make Fabulous Cakes. ( www.make-fabulous-cakes.com ) I seen the Gerbera Daisy and knew I could make it with the Cricut Cake machine. I used the CC and the MDB cart. Here is my way of doing the Gerbera Daisy using the CC machine.
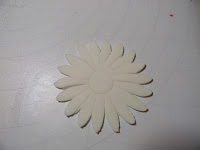
Here you will cut out 2 Daisy flowers. One at 2 1/4 and one at 2 3/4
After you cut out the flowers you will need to take a knife and cut into each petal. Here you will see a circle in the center of the flower, that is so you don't cut down to far in the center.
After you cut each petal you will need to take a paper clip and bend it at the top to make the Daisy impressions. After you have put an impression on each petal, place it in an egg container or something that will give the flower some shape. You can also use foil if you don't have any egg cartons. Use 50/50 gum paste and fondant. Or you can use Tylose and water mix. After you have made the flowers take some glue and put some in the center of the 2 3/4 one. Take the 2 1/4 flower and place the smaller one on top of the bigger one.
You will need to cut out 10 or more small Daisy's at 1 inch. Shown in the picture below you will need to cut them in half and then cut each little petal.
Once you have the small petals cut you are going to place them in the center of the flower. Use your glue to hold them in place. After you have made the first row make a second one.
Let the flower set for a little bit to harden. I took my Gerbera Daisy and airbrushed it Pink with a little luster dust. Hubby bought me an airbrush gun for my birthday back in July and this is the first time I got to use it.
After you have let it dry some, take a small piece of gum paste and roll it in a ball. Take the ball and put it in the center of the flower and push it down in the center a little. Use a small pair of scissors or something sharp. I used my exacto knife and just started cutting into the center of the flower.
Let the flower dry. This could take a day or two depending on how thick the flower is and what the temperature in your house is. I hope you will try to make one. You'll be surprised how easy this flower really is !!!
Thanks for stopping by!!
Thursday, January 20, 2011
Chocolate Heart Taffy's
Herer are the Chocolate Heart Taffy's I made for my Granddaughter's 4th birthday party this Sunday. Since Katie likes the color purple, I thought why not use it to write her name and outline the heart. Nothing fancy here, just something special for her on her special day!!
Tuesday, January 4, 2011
My First Scarf using The Knifty Knitter
I hope everyone had a wonderful holiday! We had a very nice Christmas and New Years! For Christmas my DD gave me the Knifty Knitter (purple one ). I always wanted to learn how to do loom knitting. This was so much fun to make and was really easy to do. My DD loved it !! I went back to WM to get the circle ones today because she said she needed a hat to go with the scarf. So here is my first scarf using the KK.
Subscribe to:
Comments (Atom)


